Tasty Valentine's Strawberry Shortcake
Delicious Tasty Valentine's Strawberry Shortcake recipe with step-by-step instructions.
Ingredients
For the cake::
- cooking spray
- 1.75 cups flour (I always use King Arthur all-purpose flour)
- 3/4 tsp baking powder
- 1 tsp salt
- 1 cup butter (I like Kerrygold unsalted butter for this)
- 1 cup sugar
- 4 large eggs (room temperature, about 70°F)
- 1/2 cup sour cream (adds extra moisture and a slight tang)
- 2.5 tbsp vanilla essence
For the topping::
- whipped cream (I use Cool Whip for a more stable topping)
- 1 lb strawberries (hulled and sliced into 1/4-inch pieces)
Instructions
- Preheat your oven to 350°F and lightly coat a 9-inch round cake pan (or 8x8 inch square pan) with cooking spray, ensuring even coverage on the bottom and sides. While the oven preheats, measure out all your dry ingredients into a small bowl: flour, baking powder, and salt. Whisk them together briefly to combine and aerate the flour—this ensures even leavening throughout the cake. Having everything ready before you start mixing will keep your workflow smooth and prevent overmixing the batter later.
- In a large mixing bowl, combine the softened butter and sugar, beating on medium speed for 3-4 minutes until the mixture is light, fluffy, and pale in color. This creaming process incorporates air into the batter, which helps the cake rise and creates a tender crumb. Scrape down the bowl halfway through to ensure all the butter is fully incorporated and the sugar is completely dissolved.
- Add room-temperature eggs to the creamed butter and sugar one at a time, beating well after each addition—this ensures each egg is fully incorporated before adding the next. After all eggs are added, mix in the sour cream and vanilla essence until just combined. I find that room-temperature eggs blend much more smoothly into the butter mixture, creating a silkier batter, so let them sit on the counter for 15-20 minutes before starting if needed.
- Gently fold the dry ingredient mixture from Step 1 into the wet batter from Step 3 using a spatula, stirring just until the flour disappears—do not overmix, as this can make the cake tough. Pour the batter into your prepared pan and tap it gently on the counter a few times to release any air bubbles and level the surface. Bake for 20-25 minutes until a toothpick inserted in the center comes out clean or with just a few moist crumbs.
- Allow the cake to cool in the pan for 5 minutes, then turn it out onto a wire cooling rack and let it cool completely to room temperature. Once cooled, carefully slice the cake horizontally into two equal layers using a serrated knife or cake leveler—a gentle sawing motion works best to keep the layers even and prevent crumbling.
- While the cake cools, prepare the strawberries by removing the green hulls and slicing each berry into uniform 1/4-inch pieces. If your strawberries are particularly large, you can halve them lengthwise before slicing. I like to slice strawberries just before assembling so they stay fresh and juicy rather than releasing too much liquid.
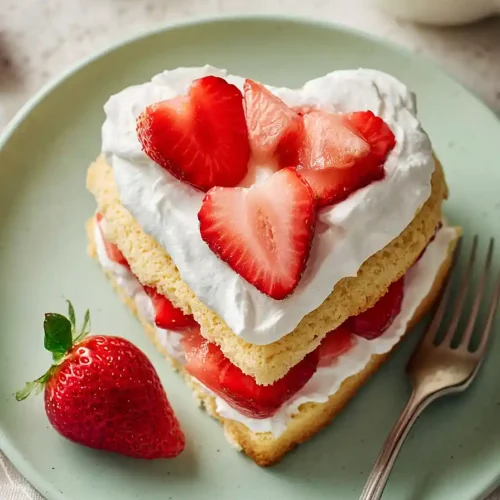
- Place the bottom cake layer on your serving plate and spread a layer of whipped cream over it, then arrange the sliced strawberries on top in an even layer. Carefully place the top cake layer on the strawberry layer and finish with a generous dollop or layer of whipped cream and a few strawberry slices for garnish. Slice and serve immediately for the best texture, as the cake will absorb moisture from the strawberries over time.