Easy Vegan Gluten Free Strawberry Rhubarb Pie
Delicious Easy Vegan Gluten Free Strawberry Rhubarb Pie recipe with step-by-step instructions.
Ingredients
For the crust::
- 3.25 cups almond flour (I always use King Arthur for a finer grind)
- 1 cup tapioca flour
- 2 tbsp coconut sugar
- 0.5 tsp salt
- 0.75 cup butter (I prefer Miyoko's Creamery for the best buttery flavor)
- 1 egg
- 1 egg white
For the filling::
- 3 cups rhubarb (cut into 1/2-inch slices)
- 3 cups strawberries (hulled and quartered into even pieces)
- 0.75 cup coconut sugar
- 3 tbsp tapioca starch (thickens the fruit juices without making them cloudy)
- 1 tsp lemon zest
- 1 tsp lemon juice
- 2 tsp cinnamon
- 0.25 tsp nutmeg
- 0.25 tsp allspice
- 0.25 tsp ground ginger
- 0.25 tsp salt
- 1 tsp vanilla (I use Nielsen-Massey for the best aroma)
Instructions
- In a food processor, combine almond flour, tapioca flour, coconut sugar, and salt, then pulse to combine. Cut the vegan butter into small cubes and add to the dry mixture, pulsing until the mixture resembles coarse breadcrumbs with some pea-sized butter pieces remaining—this creates a flaky texture. Add the egg and pulse just until the dough comes together into a shaggy mass; be careful not to overwork it or the crust will be tough. Divide the dough in half, shape each into a disc, wrap in plastic, and refrigerate for at least 1 hour. I like to make the dough the night before so it's fully chilled and easier to work with.
- While the dough chills, prepare the filling by combining the rhubarb, strawberries, coconut sugar, tapioca starch, lemon zest, lemon juice, cinnamon, nutmeg, allspice, ground ginger, salt, and vanilla in a large bowl. Gently toss everything together until the fruit is evenly coated with the spice mixture and the tapioca starch is distributed throughout. Let the filling sit at room temperature for 15-20 minutes; this allows the fruit to release some of its juices and the flavors to meld together. I find that tapioca starch works beautifully here because it thickens the filling without creating that cloudy appearance that cornstarch sometimes does.
- Preheat the oven to 425°F. On a parchment-lined surface, roll out the first dough disc into a 12-inch circle, working gently and adding a light dusting of tapioca flour if needed to prevent sticking. Transfer the rolled dough to a 9-inch pie dish, letting the edges drape slightly over the rim. Pour the fruit filling from Step 2 into the crust, arranging the fruit evenly and leaving about 1/2 inch of space at the top. Place the filled pie in the freezer while you prepare the lattice top—about 10 minutes of freezing will firm up the crust and help prevent it from shrinking.
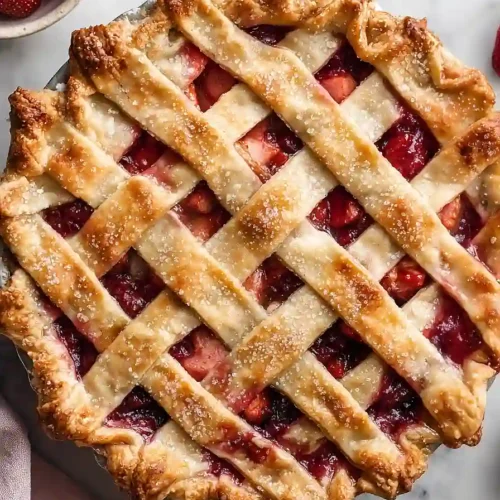
- Roll out the second dough disc to about 1/8-inch thickness and cut into strips about 3/4-inch wide using a sharp knife or pastry cutter. Retrieve the pie from the freezer and arrange the strips in a lattice pattern over the filling, weaving them over and under each other and trimming excess dough from the edges. Fold the bottom crust edges up and over the lattice to create a sealed, finished edge, pressing gently to seal. Chill the completed pie for another 10 minutes while the oven reaches temperature.
- In a small bowl, whisk together the egg white with 1 tablespoon of water to create an egg wash. Remove the pie from the refrigerator and brush the entire crust—including the lattice strips and crimped edge—with the egg wash mixture; this creates a beautiful golden-brown finish. Place the pie on a baking sheet (to catch any drips) and bake at 425°F for 15 minutes until the crust is lightly set and beginning to brown.
- After 15 minutes, reduce the oven temperature to 350°F and continue baking for 50-60 minutes until the crust is deep golden brown and the fruit filling is bubbling slightly at the edges. If the crust edges are browning too quickly, loosely tent the pie with aluminum foil halfway through baking. The longer, gentler bake allows the filling to thicken properly and the flavors to develop fully.
- Remove the pie from the oven and let it cool on a wire rack for at least 1 hour before slicing. This cooling time is essential because it allows the tapioca starch to fully set, preventing the filling from running when you cut into it. For the best texture and flavor, I prefer to let it cool to room temperature completely before serving, though it's also delicious served slightly warm.