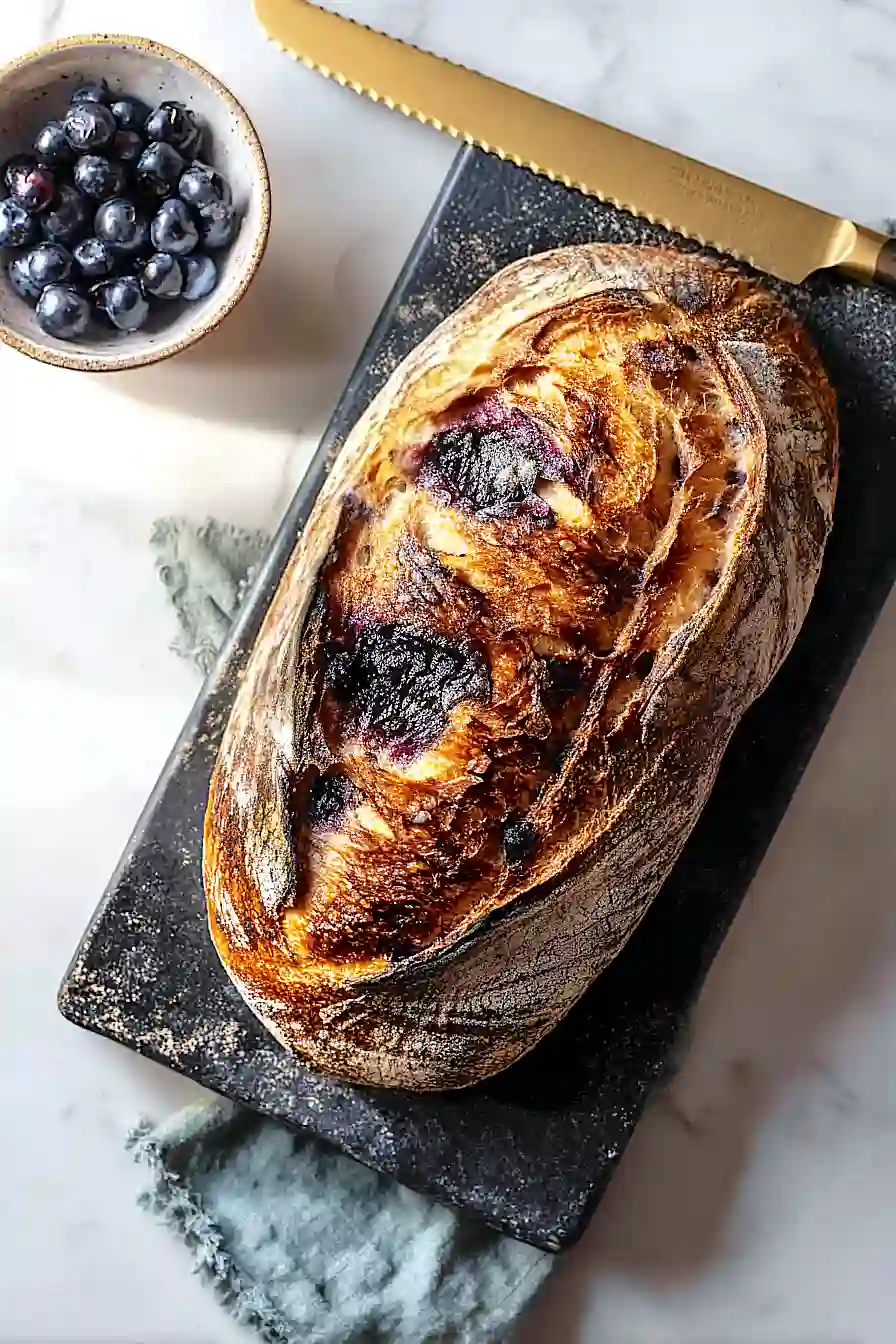
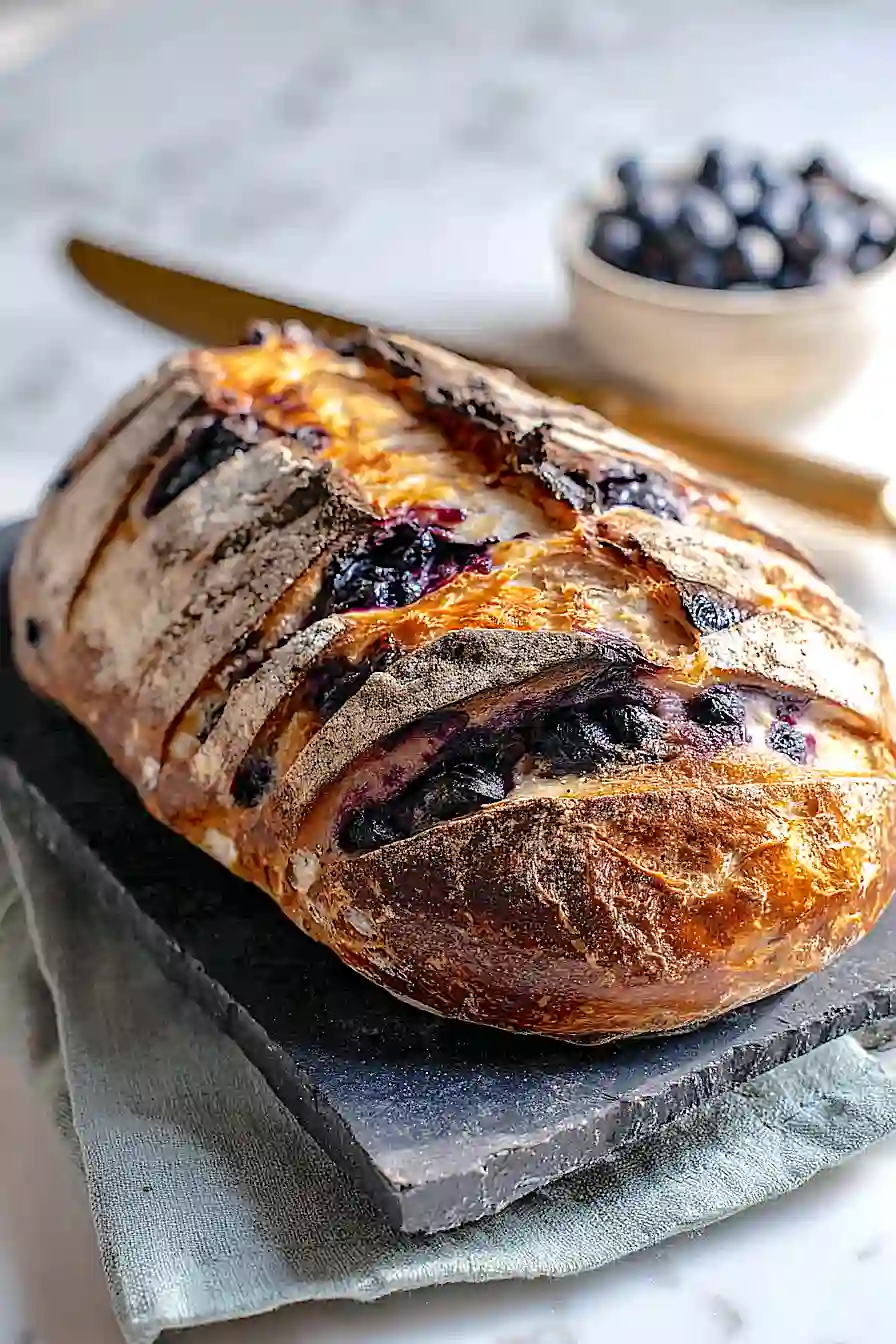
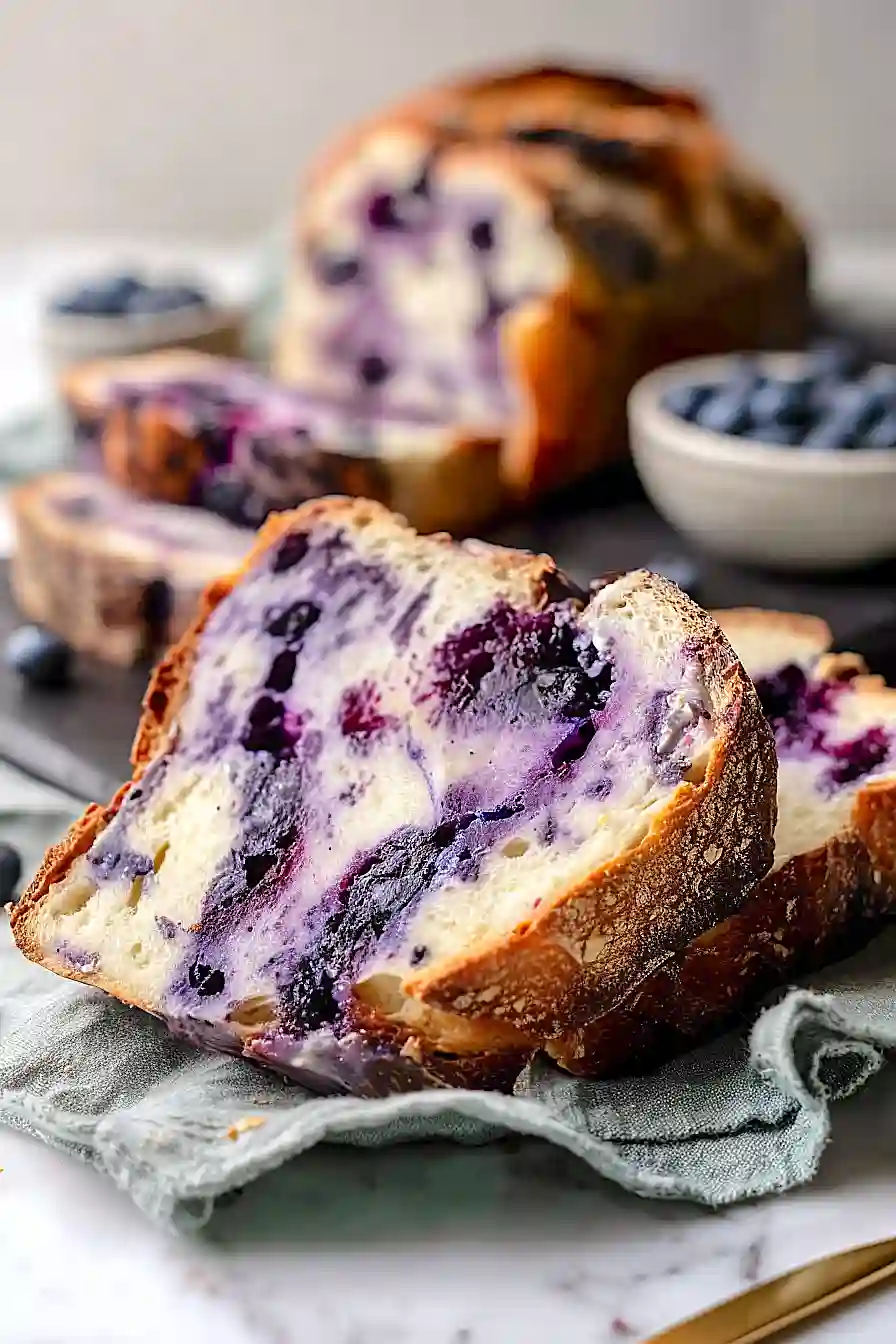
Here is my favorite blueberry goat cheese sourdough bread recipe, with tangy sourdough starter, butterfly pea powder for a natural blue color, and pockets of creamy blueberry goat cheese baked right into the dough.
This sourdough bread has become my go-to for weekend baking. The combination of tangy sourdough with the sweet-tart goat cheese is really something special, and everyone always asks about the pretty blue swirls. It takes some time with the rising, but it’s totally worth it.
Why You’ll Love This Blueberry Goat Cheese Sourdough Bread
- Unique sweet and tangy flavor combination – The creamy goat cheese pairs beautifully with blueberries, creating a bread that works just as well for breakfast toast as it does alongside a cheese board.
- Natural fermentation benefits – Sourdough is easier to digest than regular bread and has a lower glycemic index, making it a better choice for your gut health.
- Impressive homemade bread – While it takes time to rise, the actual hands-on work is minimal, and you’ll end up with a bakery-quality loaf that looks and tastes amazing.
- Simple ingredients – You only need a few basic ingredients plus your sourdough starter to create this special bread.
What Kind of Goat Cheese Should I Use?
For this sourdough bread, you’ll want to use a soft, fresh goat cheese rather than aged varieties. The creamy, spreadable kind you find in logs at the grocery store works perfectly and will create nice pockets of tangy flavor throughout your bread. If you’re not a fan of goat cheese’s distinctive taste, you can swap it out for cream cheese or even feta, though the flavor profile will change a bit. Just make sure whatever cheese you choose is at room temperature before adding it to your dough – this helps it distribute more evenly and prevents it from tearing the gluten strands you’ve worked so hard to develop.
Options for Substitutions
Here are some swaps you can make with this sourdough recipe, though a few ingredients really need to stay put:
- Sourdough starter: This is non-negotiable for sourdough bread – you really can’t substitute it. The starter is what gives the bread its signature tang and helps it rise naturally.
- Bread flour: All-purpose flour works if that’s what you have, but your bread might be slightly less chewy. You can also try a mix of whole wheat and all-purpose (maybe 100g whole wheat and 400g all-purpose) for added nutrition.
- Goat cheese: If goat cheese isn’t your thing, try cream cheese, feta, or even brie. Just crumble or cube it the same way you would the goat cheese before folding it into the dough.
- Pea powder: This adds a subtle earthy flavor and color, but you can leave it out entirely or swap it with matcha powder or spirulina for a different twist. The bread will taste great either way.
- Dutch oven: If you don’t have a Dutch oven, you can bake the bread on a baking stone or sheet pan. Just place a pan of water on the bottom oven rack to create steam during the first 20 minutes of baking.
Watch Out for These Mistakes While Baking
The biggest mistake when baking sourdough is using starter that hasn’t fully doubled in size, which leads to dense, flat bread that won’t rise properly – make sure your starter passes the float test by dropping a spoonful in water to see if it floats before you begin.
Another common error is skipping the overnight rest on the counter, as this bulk fermentation is when most of the flavor develops and the dough gains its structure.
When adding the goat cheese, resist the urge to use too much or place it too close to the edges, since this can prevent proper sealing and cause the cheese to leak out during baking.
Finally, don’t rush the cooling process – cutting into your bread before it’s completely cooled (at least an hour) will give you a gummy texture instead of that perfect chewy crumb you’re looking for.
What to Serve With Blueberry Goat Cheese Sourdough Bread?
This bread is perfect for breakfast or brunch, sliced thick and toasted with a smear of butter or cream cheese. The sweet blueberries and tangy goat cheese make it work really well alongside scrambled eggs and crispy bacon for a complete morning meal. I also love serving it with a cheese board – add some honey, fresh berries, and mixed nuts for an easy appetizer that looks fancy but takes no effort. It’s also great on its own with your afternoon coffee or tea, since the bread has enough flavor going on that it doesn’t need much else.
Storage Instructions
Store: Keep your blueberry goat cheese sourdough at room temperature in a bread box or paper bag for 2-3 days. The crust will stay crispier this way compared to plastic bags, which can make it soft. If you slice it, store it cut-side down on a cutting board to keep the inside from drying out.
Freeze: This bread freezes really well for up to 3 months. Let it cool completely, then slice it up and freeze in a freezer bag with as much air pressed out as possible. Having pre-sliced pieces means you can grab just what you need for toast or sandwiches without thawing the whole loaf.
Enjoy: Thaw frozen slices at room temperature for about 30 minutes, or toast them straight from the freezer. If you froze the whole loaf, let it sit on the counter for a few hours until it’s soft again. A quick 5-minute warm-up in a 350°F oven will bring back that fresh-baked crust.
| Preparation Time | 12-16 hours |
| Cooking Time | 45-50 minutes |
| Total Time | 13-17 hours |
| Level of Difficulty | Hard |
| Servings | 14 slices |
Estimated Nutrition
Estimated nutrition for the whole recipe (without optional ingredients):
- Calories: 1450-1600
- Protein: 55-65 g
- Fat: 22-28 g
- Carbohydrates: 250-270 g
Ingredients
For the dough:
- 3 oz active sourdough starter
- 1.6 cups filtered water
- 1.2 lb all-purpose flour (I always use King Arthur all-purpose flour)
- 1.75 tsp salt
- 1 tbsp butterfly pea powder (gives the dough a vibrant natural blue color)
- 1 tsp granulated sugar
- 1/2 tsp lemon zest
For the filling:
- 4.5 oz blueberry goat cheese (I like Vermont Creamery for its rich texture)
Step 1: Prepare and Feed Your Sourdough Starter
- 3 oz active sourdough starter
Feed your active sourdough starter several hours before you plan to mix the dough—ideally in the morning if you want to bake the next day.
The starter should roughly double in volume and show visible bubbles throughout, indicating it’s at peak activity.
This is crucial for proper fermentation and rise.
I find that a starter fed 4-6 hours before mixing gives the most reliable results.
Step 2: Mix and Autolyse the Dough
- 3 oz active sourdough starter
- 1.6 cups filtered water
- 1.2 lb all-purpose flour
- 1.75 tsp salt
In a large bowl, combine the peaked starter with filtered water and stir until mostly combined.
Add the all-purpose flour and salt, mixing until all flour is incorporated and you have a shaggy, wet dough with no dry flour visible.
Cover the bowl and let it rest (autolyse) for 1 hour at room temperature.
This resting period allows the flour to fully hydrate and develops the gluten structure naturally, resulting in better texture and rise.
Step 3: Build Strength with Stretch and Folds
- dough from Step 2
- 1 tbsp butterfly pea powder
- 1 tsp granulated sugar
- 1/2 tsp lemon zest
Starting after the 1-hour rest, perform a series of stretch and folds every 45-60 minutes for 2-4 cycles (about 3-4 hours total).
Wet your hand, grab one side of the dough, stretch it up and fold it over the center, rotate the bowl 90 degrees, and repeat until you’ve worked all four sides.
During your final fold cycle, sprinkle the butterfly pea powder, lemon zest, and granulated sugar over the dough and incorporate them with your stretches.
This builds strength progressively while the pea powder distributes evenly, creating that beautiful natural blue hue throughout.
Step 4: Cold Ferment Overnight
- dough from Step 3
After your final set of folds, cover the bowl and let the dough rest at room temperature for 30 minutes to an hour, then transfer it to the refrigerator and let it ferment overnight (8-12 hours).
Cold fermentation develops deep flavor and makes the dough much easier to shape.
The slow, cold rise also improves the bread’s structure and crumb.
Step 5: Shape and Fill with Goat Cheese
- cold dough from Step 4
- 4.5 oz blueberry goat cheese
Remove the cold dough from the refrigerator and gently place it on a lightly floured work surface.
Carefully stretch the dough into a rough square or rectangle about 8-10 inches across, being gentle to avoid deflating it too much.
Crumble or distribute the blueberry goat cheese evenly over the dough, leaving a small border around the edges.
For a round loaf, fold the edges toward the center and seal; for an oval, fold it in half and seal along the seam.
I like to keep the shaping minimal with cold dough—too much manipulation can toughen it.
Step 6: Final Proof in Banneton and Preheat Oven
- shaped dough from Step 5
Place the shaped dough seam-side up in a floured banneton basket or any round bowl lined with a flour-dusted kitchen towel.
While the dough undergoes its final proof in the refrigerator for 2 hours, preheat your Dutch oven (with lid) in a 475°F oven for at least 20 minutes.
The cold dough will proof slowly in the fridge, and the super-hot Dutch oven creates the steam needed for a gorgeous, crispy crust.
The combination of cold dough and scorching-hot vessel gives you maximum oven spring.
Step 7: Score, Bake, and Cool
- proofed dough from Step 6
Carefully remove the preheated Dutch oven from the oven (watch for steam!) and invert the cold dough directly into it, seam-side down.
Using a sharp scoring knife or lame, make one confident slash across the top—this directs the dough’s expansion.
Cover with the lid and bake at 475°F for 23 minutes, which traps steam for crust development.
Remove the lid, reduce heat to 450°F, and bake uncovered for another 23 minutes until the loaf is deep golden brown.
Transfer to a cooling rack and let it rest for at least 30 minutes before slicing—this allows the crumb structure to set properly so it won’t be gummy inside.

Perfect Blueberry Goat Cheese Sourdough Bread
Ingredients
For the dough
- 3 oz active sourdough starter
- 1.6 cups filtered water
- 1.2 lb all-purpose flour (I always use King Arthur all-purpose flour)
- 1.75 tsp salt
- 1 tbsp butterfly pea powder (gives the dough a vibrant natural blue color)
- 1 tsp granulated sugar
- 1/2 tsp lemon zest
For the filling
- 4.5 oz blueberry goat cheese (I like Vermont Creamery for its rich texture)
Instructions
- Feed your active sourdough starter several hours before you plan to mix the dough—ideally in the morning if you want to bake the next day. The starter should roughly double in volume and show visible bubbles throughout, indicating it's at peak activity. This is crucial for proper fermentation and rise. I find that a starter fed 4-6 hours before mixing gives the most reliable results.
- In a large bowl, combine the peaked starter with filtered water and stir until mostly combined. Add the all-purpose flour and salt, mixing until all flour is incorporated and you have a shaggy, wet dough with no dry flour visible. Cover the bowl and let it rest (autolyse) for 1 hour at room temperature. This resting period allows the flour to fully hydrate and develops the gluten structure naturally, resulting in better texture and rise.
- Starting after the 1-hour rest, perform a series of stretch and folds every 45-60 minutes for 2-4 cycles (about 3-4 hours total). Wet your hand, grab one side of the dough, stretch it up and fold it over the center, rotate the bowl 90 degrees, and repeat until you've worked all four sides. During your final fold cycle, sprinkle the butterfly pea powder, lemon zest, and granulated sugar over the dough and incorporate them with your stretches. This builds strength progressively while the pea powder distributes evenly, creating that beautiful natural blue hue throughout.
- After your final set of folds, cover the bowl and let the dough rest at room temperature for 30 minutes to an hour, then transfer it to the refrigerator and let it ferment overnight (8-12 hours). Cold fermentation develops deep flavor and makes the dough much easier to shape. The slow, cold rise also improves the bread's structure and crumb.
- Remove the cold dough from the refrigerator and gently place it on a lightly floured work surface. Carefully stretch the dough into a rough square or rectangle about 8-10 inches across, being gentle to avoid deflating it too much. Crumble or distribute the blueberry goat cheese evenly over the dough, leaving a small border around the edges. For a round loaf, fold the edges toward the center and seal; for an oval, fold it in half and seal along the seam. I like to keep the shaping minimal with cold dough—too much manipulation can toughen it.
- Place the shaped dough seam-side up in a floured banneton basket or any round bowl lined with a flour-dusted kitchen towel. While the dough undergoes its final proof in the refrigerator for 2 hours, preheat your Dutch oven (with lid) in a 475°F oven for at least 20 minutes. The cold dough will proof slowly in the fridge, and the super-hot Dutch oven creates the steam needed for a gorgeous, crispy crust. The combination of cold dough and scorching-hot vessel gives you maximum oven spring.
- Carefully remove the preheated Dutch oven from the oven (watch for steam!) and invert the cold dough directly into it, seam-side down. Using a sharp scoring knife or lame, make one confident slash across the top—this directs the dough's expansion. Cover with the lid and bake at 475°F for 23 minutes, which traps steam for crust development. Remove the lid, reduce heat to 450°F, and bake uncovered for another 23 minutes until the loaf is deep golden brown. Transfer to a cooling rack and let it rest for at least 30 minutes before slicing—this allows the crumb structure to set properly so it won't be gummy inside.
