I grew up thinking baked ziti was something you only ordered at Italian restaurants or ate at your friend’s house if their family was from New York. My mom made casseroles, sure, but they involved cream of mushroom soup and canned green beans—not pasta and ricotta.
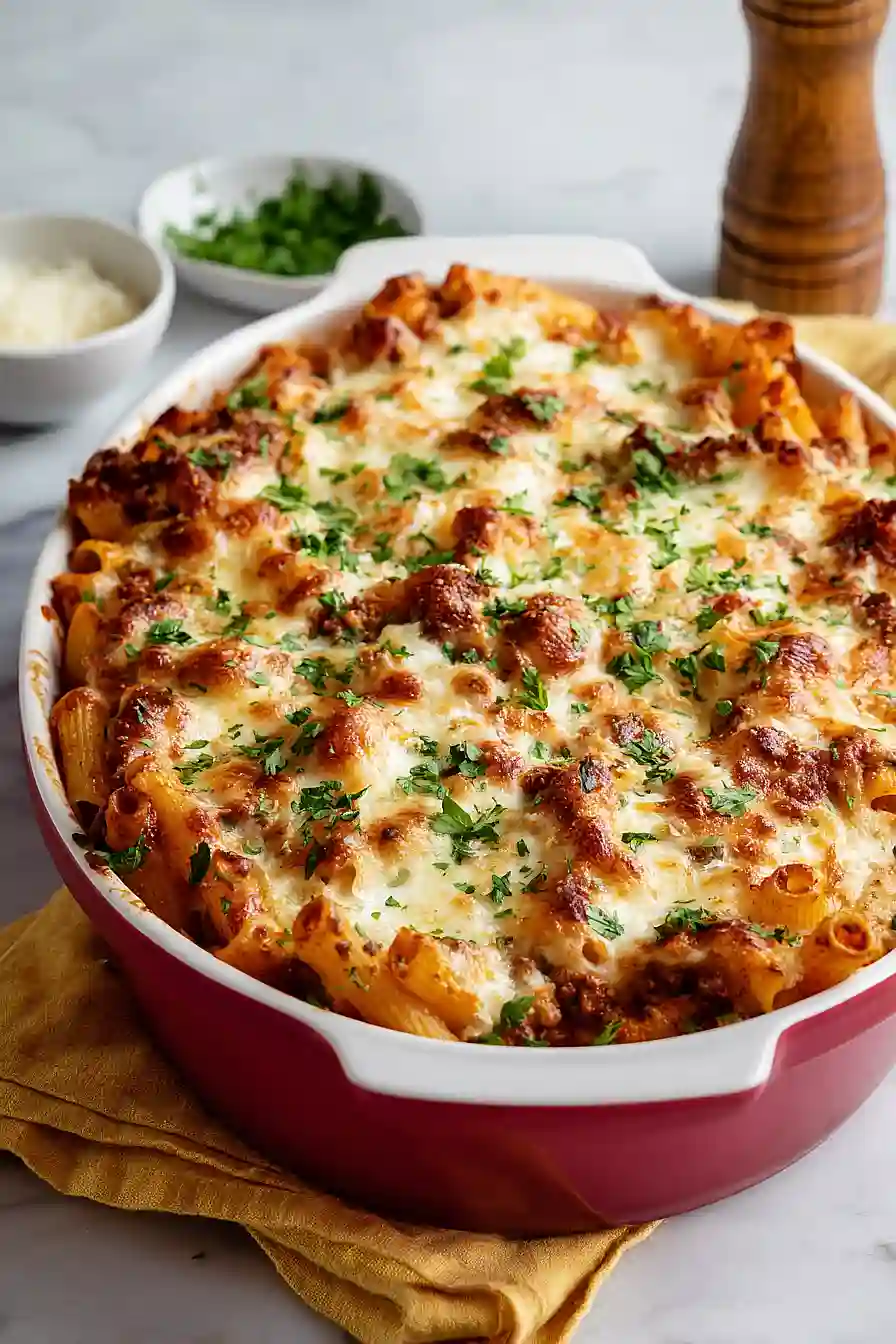
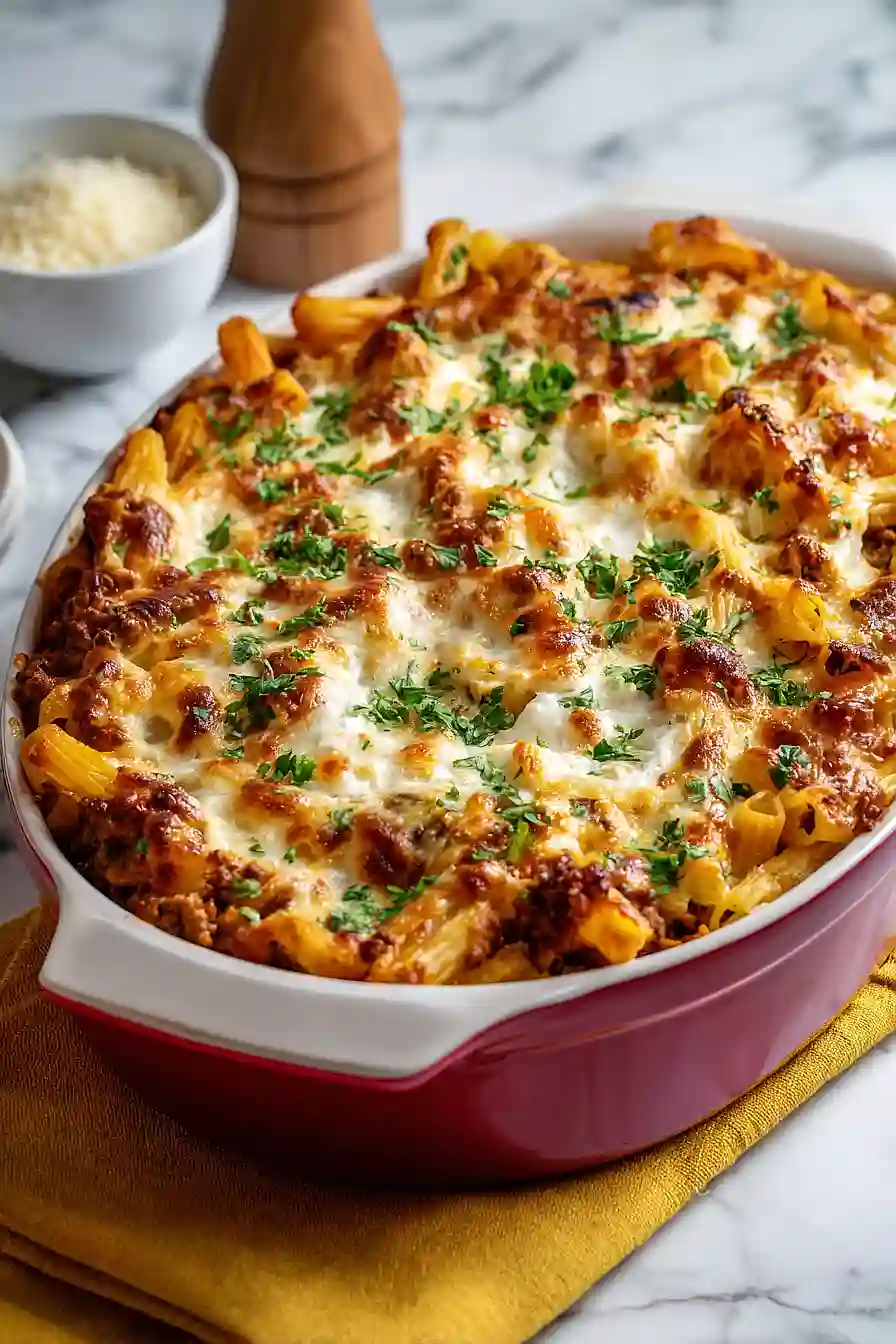
Then I figured out that baked ziti is basically just a casserole that happens to taste really good. You cook some pasta, brown some beef, mix it with ricotta and sauce, and bake it until the cheese on top gets all melty and golden. It’s the kind of dinner that makes your family think you spent hours in the kitchen, but really you just layered everything in a pan and let the oven do the work.
Why You’ll Love This Baked Ziti
- Crowd-pleasing comfort food – This cheesy, hearty pasta bake is the kind of dish that makes everyone at the table happy, from kids to adults.
- Simple ingredients – You probably have most of these pantry staples and basic ingredients on hand already, making it easy to throw together any night of the week.
- Perfect for meal prep – Make it ahead and bake it later, or enjoy leftovers that taste even better the next day. It also freezes well for future dinners.
- Budget-friendly – Ground beef and pasta are affordable ingredients that stretch far, feeding a family without breaking the bank.
- Ready in about an hour – From start to finish, you’ll have a satisfying, homemade dinner on the table in just over an hour.
What Kind of Ground Beef Should I Use?
For baked ziti, you’ll want to use ground beef with a fat content that balances flavor and texture without making your dish too greasy. I’d recommend going with 85/15 or 90/10 ground beef, which gives you enough fat for good flavor while not leaving you with a pool of grease to drain off. If you only have access to leaner ground beef like 93/7, that’ll work too, though your sauce might be slightly less rich. On the flip side, if you use something like 80/20, just make sure to drain it really well after browning so your ziti doesn’t end up swimming in oil.
Options for Substitutions
This baked ziti is pretty forgiving when it comes to swapping ingredients:
- Ziti pasta: If you can’t find ziti, penne or rigatoni work perfectly since they’re similar tube-shaped pastas that hold the sauce well. Even rotini will do in a pinch.
- Ground beef: Ground turkey, chicken, or Italian sausage (removed from casings) are all solid options. You can also go meatless and add sautéed mushrooms or extra vegetables instead.
- Ricotta cheese: Cottage cheese is a great substitute – just drain any excess liquid first. You can also use a mix of cream cheese and sour cream for a creamier texture.
- Spaghetti sauce: Any jarred marinara or tomato-based pasta sauce works here. You can also use crushed tomatoes with your own seasonings if you prefer making it from scratch.
- Mozzarella cheese: While mozzarella gives that classic stretchy cheese pull, you can use provolone, fontina, or even a Mexican cheese blend if that’s what you have on hand.
- Fresh onion and garlic: In a time crunch, use 1 teaspoon of garlic powder instead of fresh garlic, and increase the onion powder to 2 teaspoons if you’re skipping the fresh onion.
Watch Out for These Mistakes While Baking
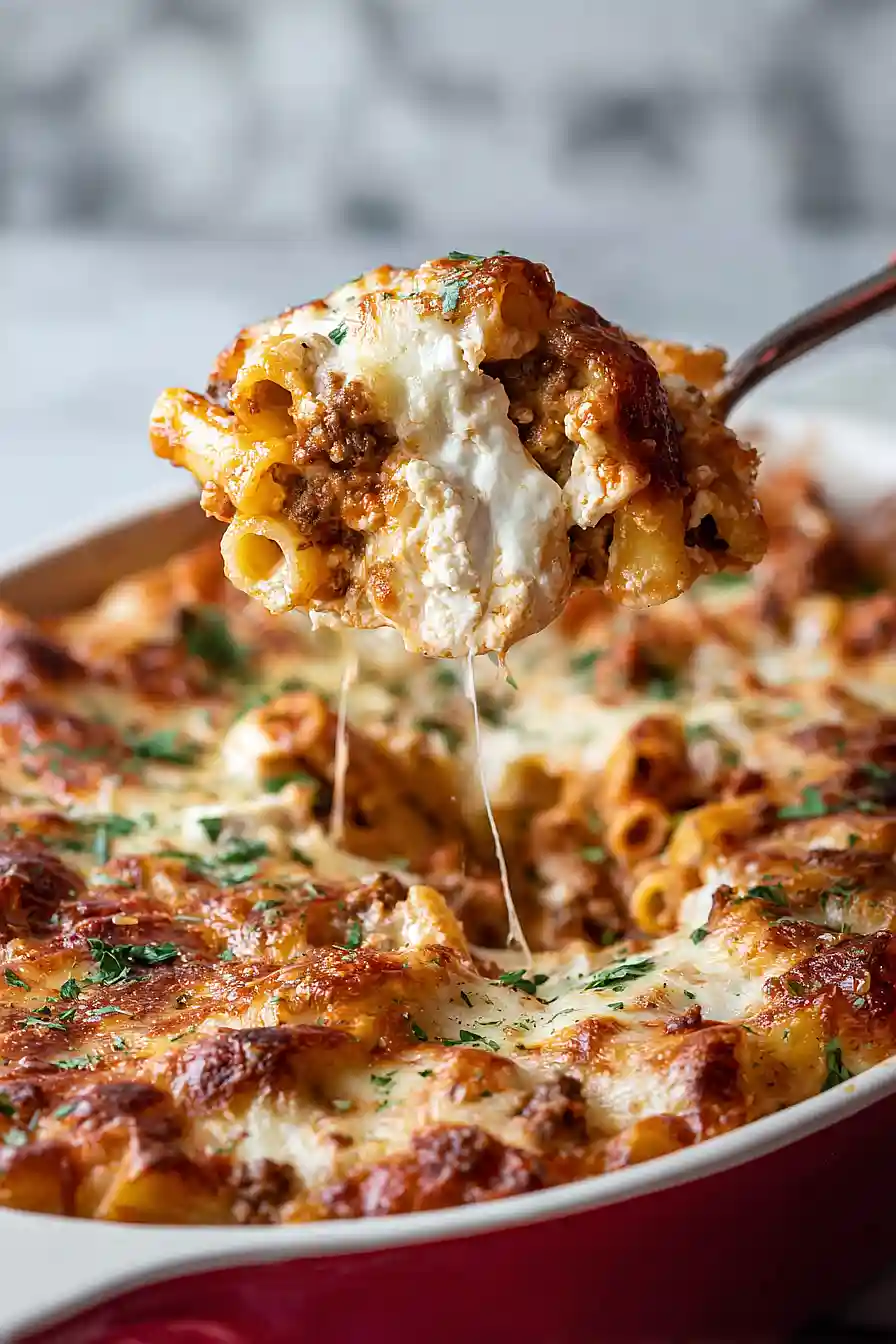
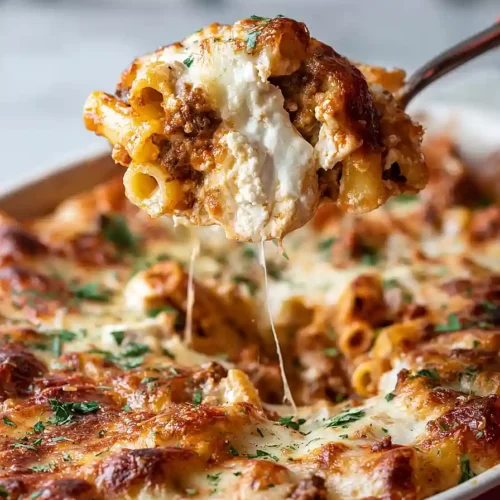
The biggest mistake people make with baked ziti is overcooking the pasta during the initial boil, which leads to mushy noodles after baking – drain your ziti when it’s still slightly firm since it’ll continue cooking in the oven. Another common error is not draining the ground beef properly, leaving excess grease that makes your casserole oily and separates from the sauce. When layering the ricotta mixture, avoid dropping it in big clumps – instead, use a spoon to dollop small amounts evenly across the surface so every bite gets some of that creamy cheese. Finally, resist the urge to skip the 5-minute resting period after baking, as this allows the cheese to set and makes serving much cleaner without everything sliding apart on the plate.
What to Serve With Baked Ziti?
A big Caesar salad is my go-to side for baked ziti – the crisp romaine and tangy dressing balance out all that cheesy, saucy pasta perfectly. Garlic bread is another must-have because you’ll want something to mop up any extra sauce on your plate. If you’re feeding a crowd, I like to add some roasted vegetables like zucchini, bell peppers, or broccoli on the side to round out the meal. A simple caprese salad with fresh tomatoes, mozzarella, and basil also works great, especially during the summer months when tomatoes are at their best.
Storage Instructions
Store: Leftover baked ziti keeps really well in the fridge for up to 4 days. Just cover it tightly with foil or transfer it to an airtight container once it’s cooled down. It actually tastes even better the next day after all the flavors have had time to hang out together!
Freeze: This is one of those dishes that’s perfect for freezing. You can freeze the whole pan before baking, or freeze individual portions after baking for easy grab-and-go meals. Either way, it’ll stay good in the freezer for up to 3 months when wrapped well.
Reheat: To warm up your baked ziti, cover it with foil and pop it in a 350°F oven for about 20 minutes until heated through. You can also microwave individual portions for 2-3 minutes, stirring halfway. Add a splash of water or extra sauce if it seems a bit dry.
| Preparation Time | 30-40 minutes |
| Cooking Time | 25-30 minutes |
| Total Time | 55-70 minutes |
| Level of Difficulty | Medium |
| Servings | 8 servings |
Estimated Nutrition
Estimated nutrition for the whole recipe (without optional ingredients):
- Calories: 3700-4000
- Protein: 190-210 g
- Fat: 170-190 g
- Carbohydrates: 295-320 g
Ingredients
For the pasta:
- 16 oz ziti
For the meat sauce:
- 1.25 lb ground beef
- 1 tbsp butter (I like Kerrygold unsalted butter for this)
- 1/2 onion, finely diced
- 5 cloves garlic, minced
- 26 oz spaghetti sauce (I use Prego traditional spaghetti sauce)
- 1 tsp onion powder
- 1.5 tsp Italian seasoning
- 3/4 tsp salt
- 1/4 tsp red pepper flakes
For the ricotta mixture:
- 15 oz ricotta
- 1 large egg
- 2 tsp sugar
- 1/3 cup Parmesan
- 1/4 tsp salt
For the topping:
- 1/2 cup Parmesan
- 2.5 cups mozzarella
Step 1: Preheat Oven and Cook the Pasta
- 16 oz ziti
Preheat your oven to 375°F.
Meanwhile, bring a large pot of salted water to a boil and cook the ziti according to package directions, but drain it 1-2 minutes early—the pasta will continue cooking in the oven, so you want it slightly al dente.
This prevents the final dish from becoming mushy.
Set the drained pasta aside in a large bowl.
Step 2: Brown the Ground Beef and Build the Sauce Base
- 1.25 lb ground beef
- 1 tbsp butter
- 1/2 onion, finely diced
- 5 cloves garlic, minced
- 26 oz spaghetti sauce
- 1 tsp onion powder
- 1.5 tsp Italian seasoning
- 3/4 tsp salt
- 1/4 tsp red pepper flakes
In a large skillet over medium-high heat, cook the ground beef, breaking it apart as it cooks, until browned (about 5-7 minutes).
Drain off excess fat and set the beef aside.
In the same skillet, melt the butter over medium heat, then add the diced onion and cook for 2-3 minutes until softened.
Add the minced garlic and cook for 1 minute until fragrant.
Pour in the spaghetti sauce and stir in the onion powder, Italian seasoning, salt, and red pepper flakes.
Return the cooked beef to the pan and simmer the sauce for 5 minutes to let flavors blend together.
Step 3: Prepare the Ricotta Mixture
- 15 oz ricotta
- 1 large egg
- 2 tsp sugar
- 1/3 cup Parmesan
- 1/4 tsp salt
In a medium bowl, combine the ricotta, egg, sugar, 1/3 cup Parmesan, and 1/4 tsp salt.
Mix until smooth and well combined.
This creamy mixture will add richness between the layers of pasta and sauce.
Step 4: Combine Pasta with Beef and Sauce
- pasta from Step 1
- beef and sauce mixture from Step 2
Pour the beef and sauce mixture from Step 2 into the bowl with the cooked pasta from Step 1.
Mix everything together thoroughly, making sure the sauce coats all the pasta evenly.
Step 5: Layer and Assemble the Baked Ziti
- pasta mixture from Step 4
- ricotta mixture from Step 3
- 2.5 cups mozzarella
- 1/2 cup Parmesan
Spread half of the pasta mixture into a 9×13 inch baking dish.
Spoon the ricotta mixture from Step 3 over the top and spread it into an even layer.
I like to use an offset spatula or the back of a spoon to distribute it evenly so every bite has that creamy richness.
Sprinkle 1.25 cups of mozzarella over the ricotta layer.
Then add the remaining pasta mixture and top with the remaining 1.25 cups mozzarella and 1/2 cup Parmesan.
Step 6: Bake and Rest the Dish
Bake the assembled ziti in the preheated 375°F oven for 25-30 minutes, until the top is golden brown and the cheese is melted and bubbly.
Remove from the oven and let it rest for 5 minutes before serving—this allows the layers to set slightly and makes serving much cleaner.
I find that skipping this rest time results in a sloppy first scoop, so it’s worth the wait!
Comforting Baked Ziti with Ground Beef and Ricotta
Ingredients
For the pasta::
- 16 oz ziti
For the meat sauce::
- 1.25 lb ground beef
- 1 tbsp butter (I like Kerrygold unsalted butter for this)
- 1/2 onion, finely diced
- 5 cloves garlic, minced
- 26 oz spaghetti sauce (I use Prego traditional spaghetti sauce)
- 1 tsp onion powder
- 1.5 tsp Italian seasoning
- 3/4 tsp salt
- 1/4 tsp red pepper flakes
For the ricotta mixture::
- 15 oz ricotta
- 1 large egg
- 2 tsp sugar
- 1/3 cup Parmesan
- 1/4 tsp salt
For the topping::
- 1/2 cup Parmesan
- 2.5 cups mozzarella
Instructions
- Preheat your oven to 375°F. Meanwhile, bring a large pot of salted water to a boil and cook the ziti according to package directions, but drain it 1-2 minutes early—the pasta will continue cooking in the oven, so you want it slightly al dente. This prevents the final dish from becoming mushy. Set the drained pasta aside in a large bowl.
- In a large skillet over medium-high heat, cook the ground beef, breaking it apart as it cooks, until browned (about 5-7 minutes). Drain off excess fat and set the beef aside. In the same skillet, melt the butter over medium heat, then add the diced onion and cook for 2-3 minutes until softened. Add the minced garlic and cook for 1 minute until fragrant. Pour in the spaghetti sauce and stir in the onion powder, Italian seasoning, salt, and red pepper flakes. Return the cooked beef to the pan and simmer the sauce for 5 minutes to let flavors blend together.
- In a medium bowl, combine the ricotta, egg, sugar, 1/3 cup Parmesan, and 1/4 tsp salt. Mix until smooth and well combined. This creamy mixture will add richness between the layers of pasta and sauce.
- Pour the beef and sauce mixture from Step 2 into the bowl with the cooked pasta from Step 1. Mix everything together thoroughly, making sure the sauce coats all the pasta evenly.
- Spread half of the pasta mixture into a 9x13 inch baking dish. Spoon the ricotta mixture from Step 3 over the top and spread it into an even layer. I like to use an offset spatula or the back of a spoon to distribute it evenly so every bite has that creamy richness. Sprinkle 1.25 cups of mozzarella over the ricotta layer. Then add the remaining pasta mixture and top with the remaining 1.25 cups mozzarella and 1/2 cup Parmesan.
- Bake the assembled ziti in the preheated 375°F oven for 25-30 minutes, until the top is golden brown and the cheese is melted and bubbly. Remove from the oven and let it rest for 5 minutes before serving—this allows the layers to set slightly and makes serving much cleaner. I find that skipping this rest time results in a sloppy first scoop, so it's worth the wait!
