I’ll be honest—I used to think gluten-free brownies meant giving up that fudgy, chewy texture we all love. Like, they’d be dry or crumbly or just kind of sad. But then I discovered King Arthur’s Measure for Measure flour, and everything changed.
The secret is treating gluten-free baking exactly like regular baking. No weird substitutions or complicated math. And when you top these brownies with a layer of peanut butter frosting? Nobody at the table will know (or care) that they’re gluten-free. They’ll just keep coming back for seconds.
Why You’ll Love These Gluten Free Brownies
- Quick and easy – These brownies come together in just 10-15 minutes, making them perfect for last-minute dessert cravings or unexpected guests.
- Gluten-free friendly – Everyone at the table can enjoy these brownies without worrying about gluten, and they taste just as good as traditional versions.
- Peanut butter frosting – The creamy peanut butter frosting takes these brownies to the next level, adding a rich, nutty flavor that pairs perfectly with chocolate.
- Simple recipe – With straightforward steps and minimal ingredients, even beginner bakers can nail this recipe on their first try.
What Kind of Brownies Should I Use?
For this recipe, you can use any gluten-free brownie base you like, whether it’s homemade or from a box mix. If you’re making brownies from scratch, almond flour or a gluten-free all-purpose flour blend both work great and give you that fudgy texture everyone loves. Box mixes labeled gluten-free have come a long way and can save you time without sacrificing taste. Just make sure your brownies are completely cooled before adding the frosting, otherwise the peanut butter topping will melt right into them and create a mess instead of a nice layer on top.

Options for Substitutions
Since this recipe calls for base recipes, here are some helpful swaps you can make:
- Gluten-free brownie recipe: If you’re not following a gluten-free diet, you can use any regular brownie recipe you love. Box mixes work great too – just follow the package directions.
- Peanut butter frosting: Not a peanut butter fan? Try chocolate frosting, cream cheese frosting, or even a simple chocolate ganache instead. If you have peanut allergies, almond butter or sunflower seed butter frosting makes a safe alternative with a similar taste.
- Frosting amount: The recipe calls for half a batch of frosting, but if you really love frosting, go ahead and use the full batch. You can also skip the frosting entirely and just dust the brownies with powdered sugar for a simpler finish.
Watch Out for These Mistakes While Baking
The biggest mistake when making frosted brownies is trying to spread frosting on warm brownies, which causes the frosting to melt and slide right off – always let your brownies cool completely to room temperature before adding any topping.
Another common error is cutting the brownies before they’ve had time to chill, resulting in messy squares with frosting that sticks to your knife and smears everywhere. For clean cuts, use a sharp knife and wipe it clean between each slice, or even better, run the knife under hot water and dry it before each cut.
Don’t skip the chilling step thinking you can save time – those 30 minutes in the fridge (or 15 in the freezer) allow the frosting to firm up properly, making the brownies much easier to cut and handle. If you’re working with gluten-free brownies specifically, be extra gentle when cutting since they can be more delicate than regular brownies and may crumble if you press too hard with your knife.
What to Serve With Gluten Free Brownies?
These brownies are pretty rich on their own, so I like to serve them with a big scoop of vanilla ice cream to balance out the sweetness. A cold glass of milk is always a winner too, especially if you’re going for that classic dessert vibe. If you’re serving these at a party or gathering, fresh berries like strawberries or raspberries on the side add a nice pop of freshness that cuts through the peanut butter frosting. You could also brew some coffee or hot chocolate to make it feel like a real dessert moment.
Storage Instructions
Store: Keep your frosted brownies in an airtight container at room temperature for up to 3 days, or in the fridge for up to a week. The fridge will keep them fresher longer, especially with that peanut butter frosting on top.
Freeze: These brownies freeze really well! Cut them into individual squares and wrap each one in plastic wrap, then store in a freezer bag for up to 3 months. You can freeze them with or without the frosting, whatever works best for you.
Serve: Let frozen brownies thaw at room temperature for about an hour before eating. If you stored them in the fridge, just take them out 10-15 minutes before serving so they’re not too cold and the texture softens up a bit.
| Preparation Time | 10-15 minutes |
| Cooking Time | 0-0 minutes |
| Total Time | 10-15 minutes |
| Level of Difficulty | Easy |
| Servings | 24 squares |
Estimated Nutrition
Estimated nutrition for the whole recipe (without optional ingredients):
- Calories: 2200-2600
- Protein: 25-35 g
- Fat: 120-160 g
- Carbohydrates: 280-320 g
Ingredients
For the brownies:
- 1.5 batches gf brownies (I always use King Arthur Measure for Measure flour for the best chew)
For the frosting:
- 2/3 batch peanut butter frosting (I prefer Jif creamy peanut butter for a smoother consistency)
- 1/2 teaspoon vanilla extract
Step 1: Prepare and Bake the Gluten-Free Brownies
- 1.5 batches gf brownie batter
Preheat your oven to 350°F and prepare your baking pan (typically 9×13 inches for 1.5 batches).
Follow your gluten-free brownie recipe using King Arthur Measure for Measure flour—I’ve found this blend creates the best chewy texture that rivals traditional brownies.
Mix your wet and dry ingredients according to your preferred brownie recipe, then pour into the prepared pan and bake for 25-30 minutes, until a toothpick inserted in the center comes out with just a few moist crumbs.
Remove from the oven and let cool completely at room temperature for at least 30 minutes; this is crucial so the frosting doesn’t melt into the warm brownies.
Step 2: Mix the Peanut Butter Frosting
- 2/3 batch peanut butter frosting ingredients
- 1/2 teaspoon vanilla extract
While the brownies cool, prepare your frosting.
In a medium bowl, combine the 2/3 batch peanut butter frosting ingredients according to your recipe, using Jif creamy peanut butter for the smoothest consistency and best spreadability.
Add the vanilla extract and mix until you reach a smooth, spreadable consistency—the frosting should be thick enough to hold its shape but soft enough to spread easily over the cooled brownies.
If the frosting seems too stiff, loosen it with a teaspoon of milk or water at a time.
Step 3: Frost and Set the Brownies
- cooled brownies from Step 1
- peanut butter frosting from Step 2
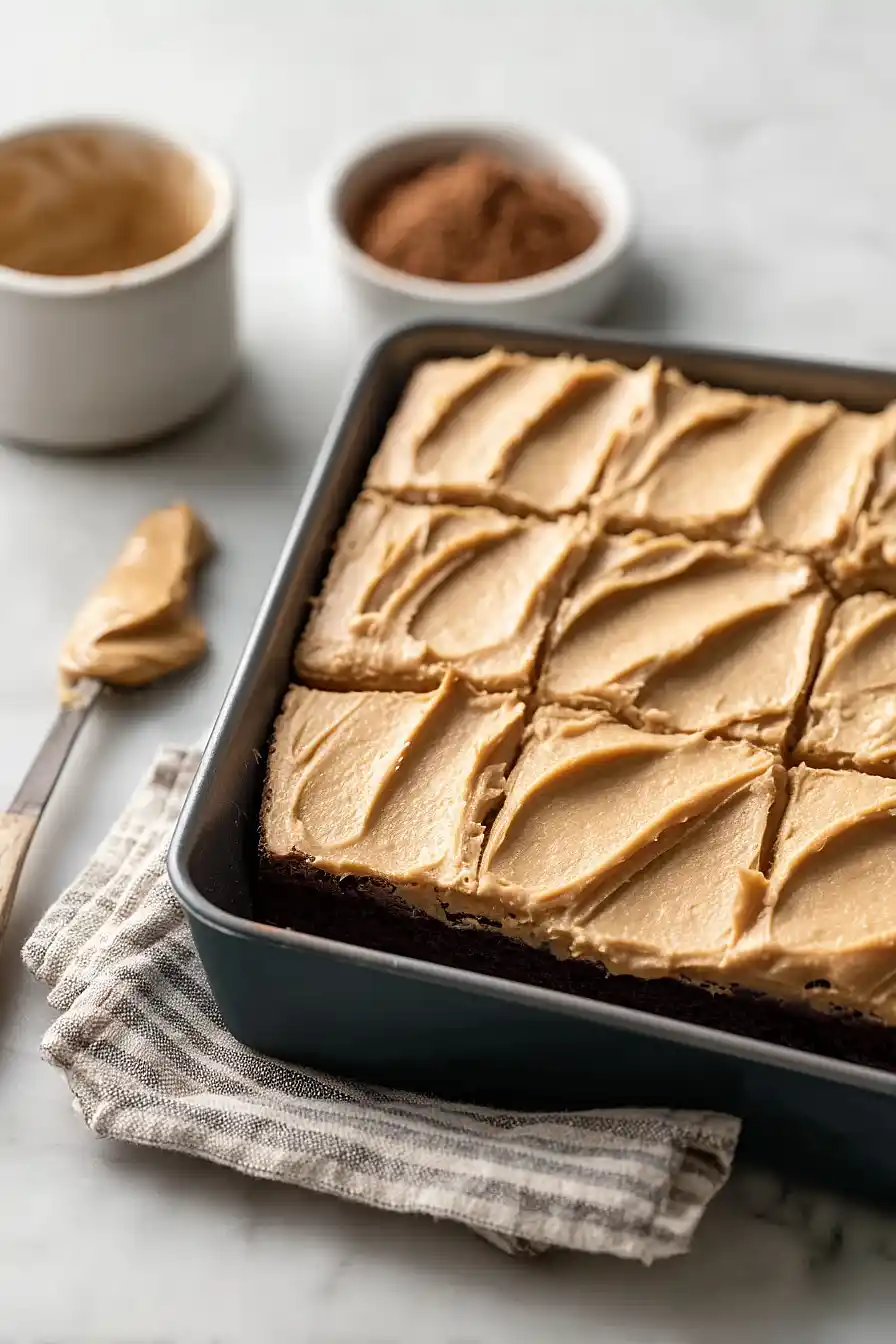
Once the brownies from Step 1 are completely cooled, spread the frosting mixture from Step 2 evenly over the top using an offset spatula or the back of a spoon.
Work quickly but gently to avoid dragging up crumbs from the brownie layer.
For the cleanest cuts and best texture, I like to chill the frosted brownies in the refrigerator for at least 30 minutes, or freeze for 15 minutes if you’re short on time—this firms up the frosting and makes it easier to cut clean squares.
Step 4: Cut and Serve
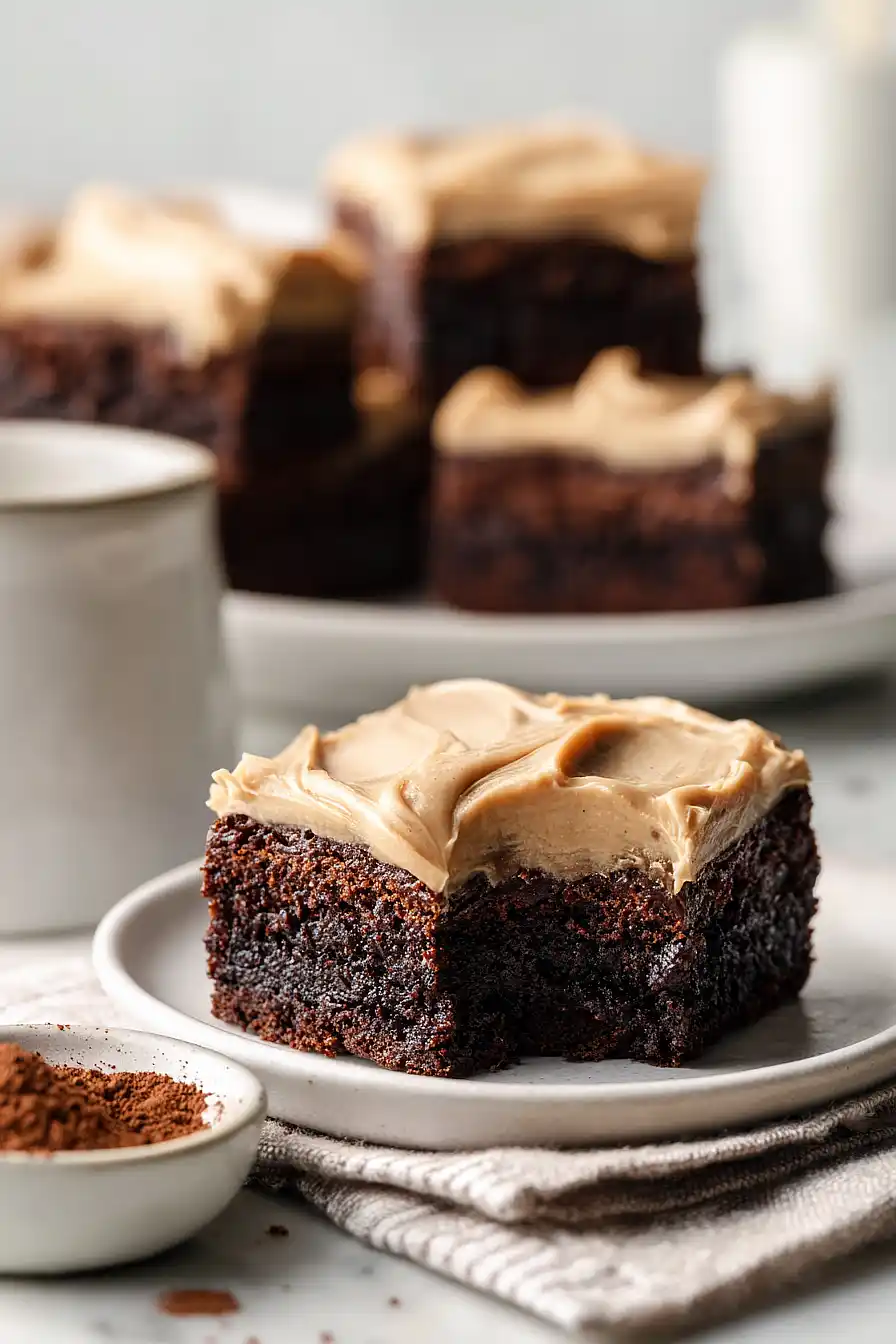
Remove the chilled brownies from the refrigerator or freezer.
Using a sharp knife (dip it in hot water and wipe clean between cuts for neat edges), cut the brownies into squares of your preferred size.
Serve immediately and enjoy—or store in an airtight container at room temperature for up to 3 days.

Irresistible Gluten Free Brownies with Frosting
Ingredients
For the brownies
- 1.5 batches gf brownies (I always use King Arthur Measure for Measure flour for the best chew)
For the frosting
- 2/3 batch peanut butter frosting (I prefer Jif creamy peanut butter for a smoother consistency)
- 1/2 teaspoon vanilla extract
Instructions
- Preheat your oven to 350°F and prepare your baking pan (typically 9x13 inches for 1.5 batches). Follow your gluten-free brownie recipe using King Arthur Measure for Measure flour—I've found this blend creates the best chewy texture that rivals traditional brownies. Mix your wet and dry ingredients according to your preferred brownie recipe, then pour into the prepared pan and bake for 25-30 minutes, until a toothpick inserted in the center comes out with just a few moist crumbs. Remove from the oven and let cool completely at room temperature for at least 30 minutes; this is crucial so the frosting doesn't melt into the warm brownies.
- While the brownies cool, prepare your frosting. In a medium bowl, combine the 2/3 batch peanut butter frosting ingredients according to your recipe, using Jif creamy peanut butter for the smoothest consistency and best spreadability. Add the vanilla extract and mix until you reach a smooth, spreadable consistency—the frosting should be thick enough to hold its shape but soft enough to spread easily over the cooled brownies. If the frosting seems too stiff, loosen it with a teaspoon of milk or water at a time.
- Once the brownies from Step 1 are completely cooled, spread the frosting mixture from Step 2 evenly over the top using an offset spatula or the back of a spoon. Work quickly but gently to avoid dragging up crumbs from the brownie layer. For the cleanest cuts and best texture, I like to chill the frosted brownies in the refrigerator for at least 30 minutes, or freeze for 15 minutes if you're short on time—this firms up the frosting and makes it easier to cut clean squares.
- Remove the chilled brownies from the refrigerator or freezer. Using a sharp knife (dip it in hot water and wipe clean between cuts for neat edges), cut the brownies into squares of your preferred size. Serve immediately and enjoy—or store in an airtight container at room temperature for up to 3 days.
