I thought I hated pumpkin desserts until I was in my thirties. Growing up, my mom’s pumpkin pie was always watery and bland, which turned me off to anything pumpkin-flavored for years.
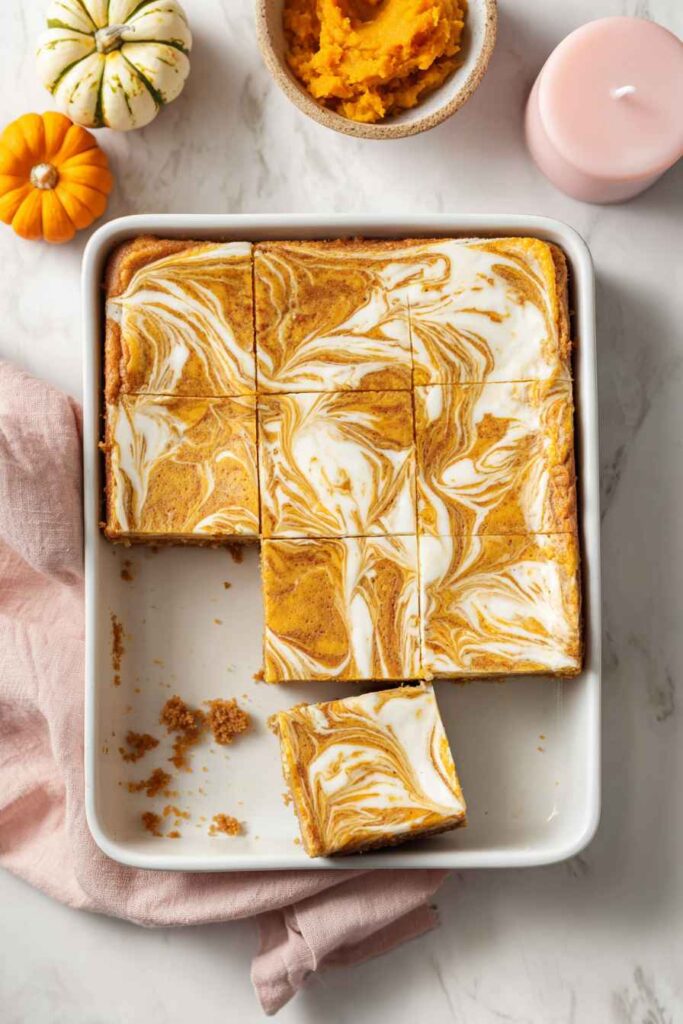
Then a friend brought these pumpkin cheesecake bars to a potluck, and everything changed. The creamy cheesecake layer mixed with just the right amount of pumpkin spice was nothing like those soggy pies from my childhood. These bars are rich without being heavy, and they slice clean every single time—no messy pie wedges that fall apart on your plate.
Why You’ll Love These Pumpkin Cheesecake Bars
- Easier than traditional cheesecake – No need for a springform pan or water bath – these bars bake right in a regular baking dish and slice up perfectly for serving.
- Perfect fall flavors – The combination of pumpkin puree, cinnamon, and pumpkin pie spice gives you all those cozy autumn tastes you crave.
- Great for feeding a crowd – One batch makes plenty of bars, making them ideal for potlucks, holiday gatherings, or when you want to share with neighbors.
- Make-ahead friendly – These bars actually taste better after chilling overnight, so you can prep them a day before your event and have one less thing to worry about.
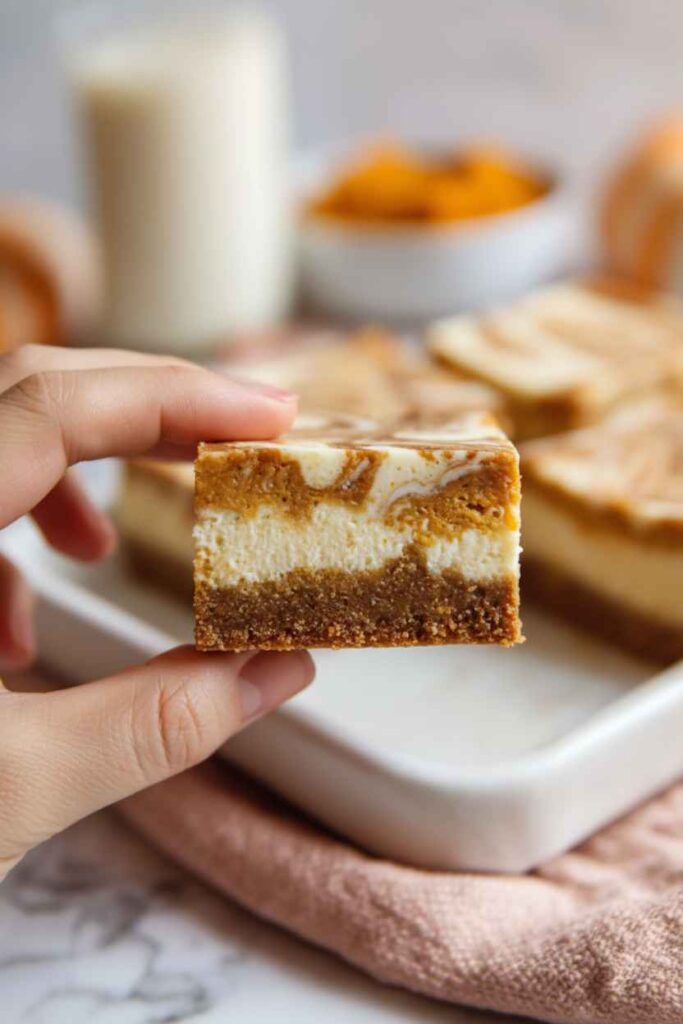
- Rich and creamy texture – The full-fat cream cheese and sour cream create that classic cheesecake richness, while the graham cracker crust adds the perfect crunch.
What Type of Pumpkin Puree Works Best?
For these cheesecake bars, you’ll want to use plain pumpkin puree, not pumpkin pie filling – there’s a big difference!
Pumpkin pie filling already has spices and sweeteners added, which will throw off the balance of your recipe. Look for cans labeled “100% pure pumpkin” or “pumpkin puree” in the baking aisle.
Libby’s is probably the most common brand you’ll find, but any pure pumpkin puree will work perfectly.

Substitution Alternatives
- Graham crackers: You can swap these for vanilla wafers, digestive biscuits, or even gingersnap cookies for extra spice. Just crush them up the same way and use the same amount.
- Pumpkin puree: Make sure you’re using plain pumpkin puree, not pumpkin pie filling. In a pinch, you could use sweet potato puree, but the flavor will be different.
- Pumpkin pie spice: Don’t have the pre-made blend? Mix together 1/2 teaspoon cinnamon, 1/4 teaspoon each of nutmeg and ginger, and 1/8 teaspoon each of cloves and allspice.
- Sour cream: Greek yogurt works as a substitute here – just make sure it’s full-fat to keep the creamy texture.
- Cream cheese: This one’s non-negotiable – you really need full-fat cream cheese for the right texture and flavor. Make sure it’s completely softened before mixing or you’ll get lumps.
- Butter: You can use salted butter if that’s what you have – just skip the added salt in the filling.
Common Mistakes to Avoid While Baking
A huge mistake when making pumpkin cheesecake bars is using cold cream cheese, which creates lumps no matter how much you mix. Make sure your cream cheese, eggs, and sour cream are all at room temperature for at least an hour before starting.
Don’t skip lining your pan with parchment paper and leaving overhang, as this makes removing the bars so much easier once they’re cooled, and always let them cool completely at room temperature before refrigerating to prevent cracks from forming on top.
Storage Tips
Refrigerate: These pumpkin cheesecake bars need to be kept cold and covered in the fridge for up to a week. I like to cover them with plastic wrap or store them in an airtight container to keep them from picking up any fridge odors. They actually taste even better after a day or two when all the flavors have had time to meld together!
Freeze: You can freeze these bars for up to 3 months, which makes them perfect for holiday prep. Cut them into individual squares first, then wrap each piece in plastic wrap and store in a freezer bag. This way you can grab just what you need without thawing the whole batch.
Serve: When you’re ready to enjoy frozen bars, just move them to the fridge about 2-3 hours before serving to thaw slowly. They taste best when they’re nice and chilled, so no need to bring them to room temperature. I love serving these straight from the fridge with a dollop of whipped cream!
| Preparation Time | 20-30 minutes |
| Cooking Time | 45-60 minutes |
| Total Time | 65-90 minutes |
| Level of Difficulty | Medium |
Estimated Nutrition
Estimated nutrition for the whole recipe (without optional ingredients):
- Calories: 3900-4200
- Protein: 50-58 g
- Fat: 250-275 g
- Carbohydrates: 360-390 g
Ingredients
For the crust:
- 15 rectangular sheets graham crackers
- 1/4 cup white sugar
- 8 tbsp unsalted butter, melted
For the pumpkin swirl cheesecake:
- 1-1/4 cups canned pumpkin puree
- 1-1/2 tsp pumpkin pie seasoning
- 1-1/2 tsp ground cinnamon
- 1 tbsp all-purpose flour
- 24 oz full fat cream cheese, softened
- 1-2/3 cup granulated sugar
- 1-1/2 tsp pure vanilla extract
- 1/2 cup full fat sour cream
- 1/8 tsp salt
- 3 large eggs, at room temperature
Step 1: Prepare the Baking Pan
Preheat your oven to 350°F (175°C).
Line a 9×13-inch baking pan with foil and lightly grease the foil for easy removal and cleanup.
I always recommend using a metal pan for best results, though a glass pan will work; just note that it may require a few extra minutes of baking time.
Step 2: Make and Bake the Graham Cracker Crust
- 15 rectangular sheets graham crackers
- 1/4 cup white sugar
- 8 tbsp unsalted butter, melted
Place the graham crackers in the bowl of a food processor and process until they form fine crumbs—this should yield just over 2 cups.
In a separate bowl, combine the graham cracker crumbs with the white sugar and melted butter, stirring until everything is evenly moistened.
Press this mixture firmly and evenly into the bottom of the prepared pan using the back of a measuring cup to ensure a compact, even layer.
Bake the crust for 10-15 minutes, until it just begins to turn golden brown and smells toasty.
Set the pan on a wire rack to cool slightly while you prepare the filling.
Step 3: Mix the Pumpkin Filling
- 1-1/4 cups canned pumpkin puree
- 1-1/2 tsp pumpkin pie seasoning
- 1-1/2 tsp ground cinnamon
- 1 tbsp all-purpose flour
In a large bowl, whisk together the pumpkin puree, pumpkin pie seasoning, ground cinnamon, and flour until smooth and well combined.
Set this pumpkin mixture aside; it will be combined with a portion of the cream cheese filling in a later step.
I sometimes like to add a pinch more cinnamon here for extra warmth and spice.
Step 4: Prepare the Cream Cheese Filling
- 24 oz full fat cream cheese, softened
- 1-2/3 cup granulated sugar
- 1-1/2 tsp pure vanilla extract
- 1/2 cup full fat sour cream
- 1/8 tsp salt
- 3 large eggs, at room temperature
In a large bowl, use a hand mixer or stand mixer with the paddle attachment to beat the softened cream cheese and granulated sugar together until completely smooth and creamy.
Add the vanilla extract, full fat sour cream, and salt, and continue beating until fully combined.
Beat in the room temperature eggs one at a time, mixing just until each egg is fully incorporated to avoid overbeating.
Make sure to scrape the sides of the bowl as needed.
Step 5: Combine and Swirl Fillings
- cream cheese mixture from Step 4
- pumpkin mixture from Step 3
Measure out 1-1/2 cups of the cream cheese mixture from Step 4 and gently fold it into the pumpkin mixture from Step 3 until fully combined.
Dollop alternating scoops of plain cream cheese filling (from Step 4) and pumpkin-cream cheese filling (from this step) all over the surface of the cooled crust.
Use a sharp knife to swirl the two mixtures together in a decorative pattern—I like to make figure eights for a beautiful marbled effect.
Be careful not to drag the knife down so far that it disturbs the crust underneath.
Step 6: Bake, Cool, and Chill
Bake the assembled bars in the center of the preheated oven for 35-45 minutes.
The edges should look set while the center retains a very slight jiggle; do not overbake.
Once done, place the pan on a wire rack and allow it to cool completely.
Then, transfer the bars to the refrigerator and chill for several hours until firm—this helps the flavors meld and ensures clean slices.
For the best presentation, I like to refrigerate them overnight before serving.

Smooth Pumpkin Cheesecake Bars
Ingredients
For the crust:
- 15 rectangular sheets graham crackers
- 1/4 cup white sugar
- 8 tbsp unsalted butter, melted
For the pumpkin swirl cheesecake:
- 1-1/4 cups canned pumpkin puree
- 1-1/2 tsp pumpkin pie seasoning
- 1-1/2 tsp ground cinnamon
- 1 tbsp all-purpose flour
- 24 oz full fat cream cheese, softened
- 1-2/3 cup granulated sugar
- 1-1/2 tsp pure vanilla extract
- 1/2 cup full fat sour cream
- 1/8 tsp salt
- 3 large eggs, at room temperature
Instructions
- Preheat your oven to 350°F (175°C). Line a 9×13-inch baking pan with foil and lightly grease the foil for easy removal and cleanup. I always recommend using a metal pan for best results, though a glass pan will work; just note that it may require a few extra minutes of baking time.
- Place the graham crackers in the bowl of a food processor and process until they form fine crumbs—this should yield just over 2 cups. In a separate bowl, combine the graham cracker crumbs with the white sugar and melted butter, stirring until everything is evenly moistened. Press this mixture firmly and evenly into the bottom of the prepared pan using the back of a measuring cup to ensure a compact, even layer. Bake the crust for 10-15 minutes, until it just begins to turn golden brown and smells toasty. Set the pan on a wire rack to cool slightly while you prepare the filling.
- In a large bowl, whisk together the pumpkin puree, pumpkin pie seasoning, ground cinnamon, and flour until smooth and well combined. Set this pumpkin mixture aside; it will be combined with a portion of the cream cheese filling in a later step. I sometimes like to add a pinch more cinnamon here for extra warmth and spice.
- In a large bowl, use a hand mixer or stand mixer with the paddle attachment to beat the softened cream cheese and granulated sugar together until completely smooth and creamy. Add the vanilla extract, full fat sour cream, and salt, and continue beating until fully combined. Beat in the room temperature eggs one at a time, mixing just until each egg is fully incorporated to avoid overbeating. Make sure to scrape the sides of the bowl as needed.
- Measure out 1-1/2 cups of the cream cheese mixture from Step 4 and gently fold it into the pumpkin mixture from Step 3 until fully combined. Dollop alternating scoops of plain cream cheese filling (from Step 4) and pumpkin-cream cheese filling (from this step) all over the surface of the cooled crust. Use a sharp knife to swirl the two mixtures together in a decorative pattern—I like to make figure eights for a beautiful marbled effect. Be careful not to drag the knife down so far that it disturbs the crust underneath.
- Bake the assembled bars in the center of the preheated oven for 35-45 minutes. The edges should look set while the center retains a very slight jiggle; do not overbake. Once done, place the pan on a wire rack and allow it to cool completely. Then, transfer the bars to the refrigerator and chill for several hours until firm—this helps the flavors meld and ensures clean slices. For the best presentation, I like to refrigerate them overnight before serving.
